Today we are taking about setting a testing/deployment pipeline for your Django app using Codeship and AWS CodeDeploy
If you have been working with Django (and probably web in general) you must be already used to do deployments this way (assuming you do testing):
- Run the tests for my app
- SSH to my server
- Set up my repository and clone the branch i want to deploy. If that was already done, then pull the latest changes.
- Install system wide dependencies
- Install python dependencies
- Run collectstatic
- Restart application server (uwsgi, gunicorn, etc)
For a minor update, doing all these steps can take around 10 to 15 minutes.
In my current deployment pipeline all i need to do is:
git push origin master
And that’s it.
Codeship is in charge of running my tests and sending the current build to AWS CodeDeploy, where it does everything in the list for me.
Setting up this pipeline takes some time upfront, but you will see the increase in productivity from day 1.
Setting up Codeship
Codeship is a service that helps you with the implementation of continuous integration. You can do it with Jenkins too, sure, but Codeship makes it so easy that it should not take more than 15 minutes to set up a new repository and get a green build.
It has support for Bitbucket and Github.
- Obviously the first step is to create an account.
- Go to create new project and select the service where you have your repository.
- Find your repository in the list and select it.
- On the next step you will have to add the commands to install dependencies, run migrations and tests, etc.
You should see something like this:

You will need to modify those commands to work with the structure of your project.
In Setup commands you should have something like:
    pip install -r requirements.txt
    python manage.py migrate --noinput
And in Configure Test Pipelines:
python manage.py test
Or if you are using coverage:
coverage run manage.py test
- If you are keeping sensitive data out of repositories (as you should), you will probably want to set some environment variable, like your database URL. On the top right, go to project settings / Environment variables.
Codeship sets up several databases for you to use (pg, mysql). For Django and Postgres you will end up using something like:DATABASE_URL = postgres://$PG_USER:$PG_PASSWORD@localhost:5434/test
- And that’s it. At this point whenever you push something to your repository you will see Codeship listening to it and trying to run everything you tell it to. If it fails, you can see the logs and adjust your project until you fix it.
So far we are getting feedback on our tests pushed to the repository.
That alone is a huge help if you are testing properly because you will have instant feedback if there are regressions or issues on your applications.
If you added a new dependency and forgot to add it to your requirements, it will complain too, forcing you to have your dependency list up to date, which will help when you want to automate your deployment.
Setting up CodeDeploy
This section assumes you are familiar with AWS services.
If you are not, create an account and try it. It is free for the first year, so why not?
Compared to Codeship, AWS CodeDeploy takes a little longer to set up.
I will point out the points that were confusing at first to me and provide a general guide, but I recommend reading the documentation because there are a lot of things to set up on your AWS account to be able to use it.
CodeDeploy requires an agent installed on the EC2 instances it is going to deploy in. You can find instructions about the agent on the documentation.
If you are trying this for the first time, you probably don’t have it installed and will need to run (Assuming you are using Ubuntu):
sudo apt-get update

sudo apt-get install awscli

sudo apt-get install ruby2.0

cd /home/ubuntu

sudo aws s3 cp s3://bucket-name/latest/install . --region region-name sudo chmod +x ./install
sudo ./install auto
Change bucket-name and region-name to the values mentioned in the docs.
You will need 3 more things to be able to use CodeDeploy:
- Create a service role: This role is required to run CodeDeploy.
- Create an instance profile: This role will be used by the agent on your EC2 instances to access S3, service where Codeship stores our successful builds. Make sure that you are starting your EC2 instance with this IAM Role or you will have errors.
- Create an user to access the service: The user will have some credentials and permissions that we need to access the service (ACCESS_KEY and SECRET_ACCESS_KEY).
Once you have these requirements, go to the CodeDeploy service and create a new app. Take note of your Application Name and Deployment Group. For the ADD INSTANCE section, pick key=name and value=whatever-name-my-instance-has.
For the DEPLOYMENT CONFIGURATION pick ONE AT A TIME.To finish, pick the service role you created earlier on the SERVICE ROLE dropdown.
Ok, we have a CodeDeploy application now, but how do I tell it about my application and whatever I am doing to deploy? After all, there are many things that can go wrong in that process.
The CodeDeploy agent is expecting a file named appspec.yml.My appspec.yml looks like this:
version: 0.0
os: linux
files:
  - source: /
    destination: /srv/app
permissions:
  - object: /srv/app
    owner: ubuntu
    group: ubuntu
hooks:
  BeforeInstall:
    - location: clean_instance.sh
      timeout: 6000
      runas: root
  AfterInstall:
    - location: install_os_dependencies.sh
      timeout: 6000
      runas: root
    - location: install_python_dependencies.sh
      timeout: 6000
      runas: ubuntu
  ApplicationStart:
    - location: start_application.sh
      timeout: 6000
      runas: root
The file defines several hooks, where you can plug scripts to run specific tasks on your instance.
|In my case i have a stateless app, which means i can just remove the whole app and replace it with the new one.
If you need something more specific you may be able to do it with these hooks.
We are almost ready with this setting a testing / deployment pipeline for your Django app
The last step is creating a deployment pipeline in Codeship that sends the successful builds to CodeDeploy.
In Codeship go to your project settings / Deployment:
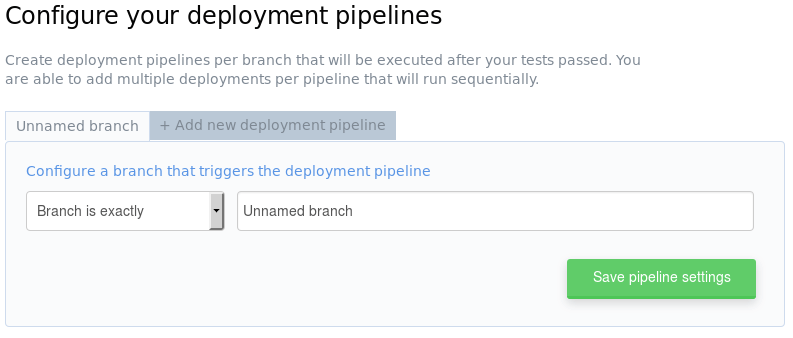
You can use any branch name (i.e. master) and save your pipeline settings. On the selector below, pick CodeDeploy.
You will need to fill some information, like your CodeDeploy application name, your deployment group name, your credentials and a path to an S3 bucket. This bucket will contain your successful builds.
Once you are done, try pushing to your repository.
Your pipeline will start failing if the deployments are not successful, and you will need to review the deployment logs directly on CodeDeploy.
However, if your deployments are working, welcome to a new world where you deploy in 5 seconds instead of 15 minutes (of your time, not server’s time, the testing and deployment may take some time).
Last but not least in this testing / deployment pipeline
This post was very general and I may write additional posts about each step involved.
However, the main issues and most important pieces of documentation are exposed here and should serve as a start point for whoever wants to try to set this up. Give it a chance, I am confident that if you make it work you won’t be coming back to the old way.
Follow us in social media and keep in touch
Related post
Our website is powered by Django and Amazon Web Services, and yours?