Animations with JavaScript

When building a website, it is intended to be striking, but without sacrificing usability and functionality. To achieve this, different animations or effects can be used to call user attention. However, implementing an animation can be limiting; for example, the wide variety of mobile devices on the market generate the need of implementing websites for a big quantity of different screen sizes.
Making an animation with JavaScript is relatively easy even if you are a beginner. It must be considered that, to begin, it is needed to be familiar with the JS events basics. These events allow detecting when a container has been accessed, the mouse has been moved, the user has clicked an element; among others. Once the event occurs, a specific section of code is executed, usually a function.
In this case, we will perform a simple animation : an element will go up little by little and will show a brief description when the mouse cursor enters it.
First, the HTML needs to be created, as follows:
As you can see, there are two events to consider, onmouseenter and onmouseleave. The onmouseenter event detects when the mouse enters the element where the event has been declared. Once the event occurs, the function inover (explained below) will be executed. In a similar way, the onmouseleave event detects when the mouse goes out of the element. Again, once the event happens, a function will be executed ; in this case the function outover.
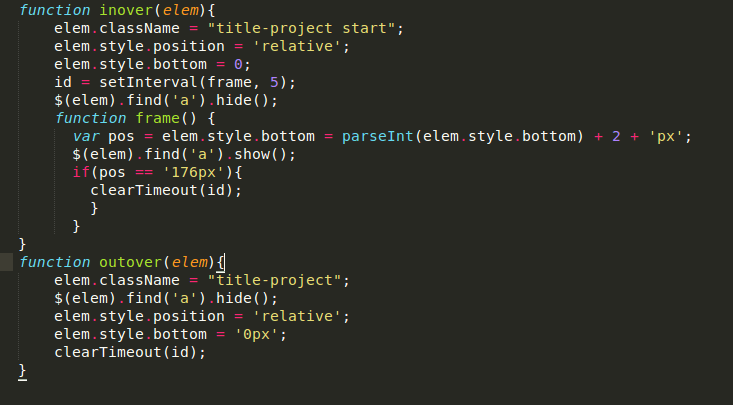
The functions inover and outover are defined as follows:
The inover function receives the item with the class title-project as a parameter and adds it to the start class. Then, the frame function is called in time intervals defined with the setInterval method.
The aim of the frame function is to add up 2px to the position title-project start currently has. The frame function is called until the position of title-project start is 176px and the the information that title-project contains is shown; When the position is equal to 176px the clearTimeout method is called to stop executing the frame function inside the SetInterval.
On the other hand, The outover function receives the title-project start element as a parameter and removes the start class from it. Later, it calls the clearTimeout method to avoid calling the frame function and returns the element position to 0px; returning it to its original state and hiding the message.
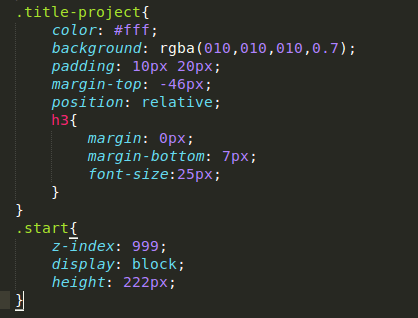
Finally, CSS is used to create the starting styles:
In this case, CSS is used to define font sizes, background color and the height of the container. The following properties are applied to the container with col-sm-4, CSS would be defined as follows:
This is to avoid that the container is not displayed with its information when the animation has not been made.
As shown in previous example, implementing an animation with JavaScript is pretty easy; you just need to know about JS events. Although this blog only discussed two types of events (onmouseenter and onmouseleave) and a basic animation, JavaScript has a long list of defined events that will help you to create animations according to your needs.
In the next blog entry, I will explain the same animation but this time we will rely on CSS3 .
To see the result of this animation, you can go here


