First thing first, I am no expert on machine learning. But I am studying it and I am very interested in it. This blog post is product of what I have studied so far, so I apologize for the errors or imprecisions it may have. Taking this into consideration, let’s start.
First, lets define some basic concepts.
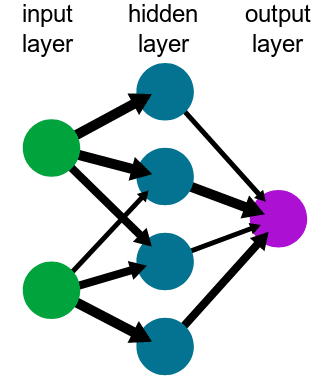
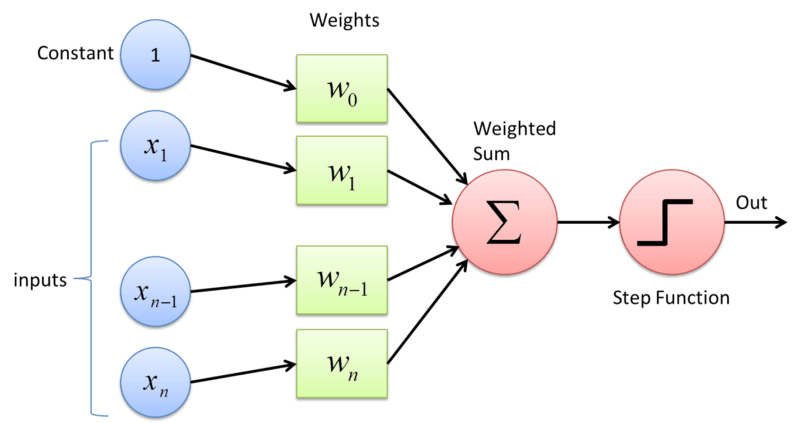
Perceptron: It is the classic structure of a neural network. Think of it as a normal mathematical function with n inputs and one output. It is composed of some weights, a bias and an activation function. The weights and the bias of the perceptrons are modified during the training to get more accurate results.
Neural Network: It is the system that is in charge of the computing. It is composed by a group of nodes interconnected. For the kind of Neural Network we are going to use, a Multi Layer Perceptron, the network is composed by several layers of connected perceptrons. The amount of them depends on the complexity of the network.


Training: It is the process to obtain the weights on your network that will return the desired result. It is done using training data and iterating several times until the error is acceptable. I am not going to describe the mathematical calculations related, but it has a lot of linear algebra. So, if you are interested in this subject, you should study linear algebra.
Model: The representation of the neural network. It is what represents mathematically a simplified version of a real life situation. It will change on the training; That’s the whole idea of it!

Activation function: I had troubles understanding this first, but it is quite simple. Basically, the output data you will obtain from your model depends on the input data, but you do want to have control on it; so you use an activation function. Depending on the activation function, you may obtain different ranges for the output data. For example, you may obtain [0,1], [-1,1], etc. This allow you to know how your data will be returned and what does this means (a probability, for example). I will not go deeper on this subject, but is is very important to know what activation functions exist, what does each one do and what does the data represents depending on the used activation function.
Ok. With these concepts defined, we are able to use pytorch to solve a basic problem: To train a model that is able to classify an image from the Fashion-MNIST dataset: a set of 28×28 greyscale images of clothes that is used as a starting point to learn pytorch. Remember to install pytorch before continuing.
Defining and training the model
So, before we start, we should import the F-MNIST dataset from the torchvision package. Considering that this dataset is very used as a starting point, pytorch has it as a preloaded dataset. I am not going to explain every line here, we are simply downloading and normalizing the data to make sure that all the images have the same properties. Usually, we would need to resize the images as well, but the dataset we are using has already done this for us, so it is not necessary.
import torch
from torchvision import datasets, transforms
import helper

# Define a transform to normalize the data
transform = transforms.Compose([transforms.ToTensor(),
                                transforms.Normalize((0.5, 0.5, 0.5), (0.5, 0.5, 0.5))])
# Download and load the training data
trainset = datasets.FashionMNIST('~/.pytorch/F_MNIST_data/', download=True, train=True, transform=transform)
trainloader = torch.utils.data.DataLoader(trainset, batch_size=64, shuffle=True)

# Download and load the test data
testset = datasets.FashionMNIST('~/.pytorch/F_MNIST_data/', download=True, train=False, transform=transform)
testloader = torch.utils.data.DataLoader(testset, batch_size=64, shuffle=True)
After we start, we should define the model. For this, pytorch offers several options. We are going to define it as a class, but we may also use the torch.nn.Sequential module. So, here is our model.
from torch import nn, optim
import torch.nn.functional as F
class Classifier(nn.Module):
    def __init__(self):
        super().__init__()
        self.fc1 = nn.Linear(784, 256)
        self.fc2 = nn.Linear(256, 128)
        self.fc3 = nn.Linear(128, 64)
        self.fc4 = nn.Linear(64, 10)

    def forward(self, x):
        # make sure input tensor is flattened
        x = x.view(x.shape[0], -1)

        x = F.relu(self.fc1(x))
        x = F.relu(self.fc2(x))
        x = F.relu(self.fc3(x))
        x = F.log_softmax(self.fc4(x), dim=1)

        return x
So, Our model will have 784 inputs (because each image is 28×28 pixels) and 10 outputs. These outputs are defined by the dataset we are using. If you check the Fashion-MNIST dataset documentation, you will notice that the images are classified in 10 classes. So, our model will return the probability of an image belonging to each of this classes.
As you may see, we use the __init__ function to define the layers of our network. The first number is how many inputs our layer will have, and the second is how many outputs. Notice that the first number of our first layer is the number of inputs the system has and the last number of the last layer is the number of outputs. That is why these layers are called the input and output layers respectively.
Then, we define the forward methods. This method will analyze the input, move the data through the layers and return the result. If you notice, we use the RELU as the activation function for the hidden layers but the SoftMax function as the activation function for the output layer. It is because SoftMax returns a value between 0 and 1 that may be used as a probability. I am not going deeper on this subject, but it is one of the most used functions on machine learning. The log_softmax simply uses log function after obtaining the result in order to avoid using small values on the training process. To get the real value, you just need to use exp on the result.
After we define our model, we need to define the loss function we are going to use, usually called criterion. As well, we need to define the optimizer algorithm that we are going to use. You may check the documentation to read about the different algorithms that you may use.
model = Classifier()
criterion = nn.NLLLoss()
optimizer = optim.Adam(model.parameters(), lr=0.003)
And now, we are going to train our model.
epochs = 5
for e in range(epochs):
    for images, labels in trainloader:
        log_ps = model(images)
        loss = criterion(log_ps, labels)
        optimizer.zero_grad()
        loss.backward()
        optimizer.step()
We will perform 5 training steps (epochs) to train our model. It should be enough to have a low error on the network because we are using a simple dataset. For a bigger and more complex dataset, images with colors and different dimensions for example, we would require a complexer network as well as more epochs and other considerations that I am not going to explain here.
After this, our model will have the weights and bias values updated to classify correctly an image from our dataset. So, let’s test it!
# we get one random image from the dataset
dataiter = iter(testloader)
images, labels = dataiter.next()
img = images[1]
ps = torch.exp(model(img))
With a little help from matplotlib and numpy, we may get and image like this:

And that’s it! We have a basic neural network that is able to classify an image.
Machine learning is a big and complex subject that I have just started exploring. As well, Pytorch is a very intuitive and powerful library that will ease the programing process; specially if you are new to this subject.
I would like to thank Udacity and facebook for their deep learning with pytorch course. All the code and the material used from this blog post is from there and all the intellectual credits belong to them. I just wanted to use it to share a little blog post about machine learning and to attract more people to this subject. You may find this code on their github account.
