Introducción al Machine Learning y pytorch

Primero lo primero, no soy un experto en Machine Learning. Pero lo estoy estudiando y estoy muy interesado en ello. Esta publicación de blog es producto de lo que he estudiado hasta ahora, así que me disculpo por los errores o imprecisiones que pueda tener. Teniendo esto en cuenta, comencemos.
Primero, definamos algunos conceptos básicos.
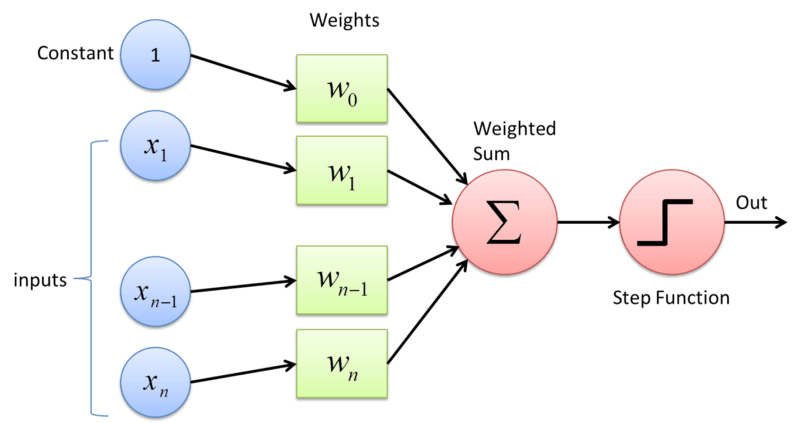
Perceptrón: es la estructura clásica de una red neuronal. Piense en ello como una función matemática normal con n entradas y una salida. Se compone de algunos pesos, un sesgo y una función de activación. Los pesos y el sesgo de los perceptrones se modifican durante el entrenamiento para obtener resultados más precisos.
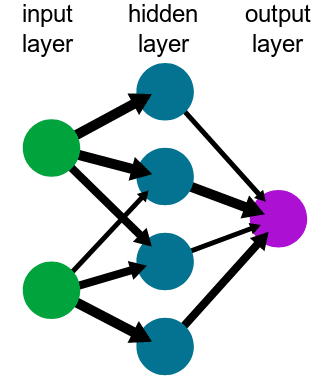
Red Neuronal: Es el sistema que se encarga de la informática. Está compuesto por un grupo de nodos interconectados. Para el tipo de red neuronal que vamos a utilizar, un Perceptrón Multicapa, la red está compuesta por varias capas de perceptrones conectados. La cantidad de ellos depende de la complejidad de la red.
Entrenamiento: Es el proceso para obtener los pesos en su red que devolverá el resultado deseado. Se realiza utilizando datos de entrenamiento e iterando varias veces hasta que el error sea aceptable. No voy a describir los cálculos matemáticos relacionados, pero tiene mucha álgebra lineal. Entonces, si está interesado en este tema, debe estudiar álgebra lineal.
Modelo: La representación de la red neuronal. Es lo que representa matemáticamente una versión simplificada de una situación de la vida real. Cambiará en el entrenamiento; ¡Esa es toda la idea!
Función de Activación: Tuve problemas para entender esto primero, pero es bastante simple. Básicamente, los datos de salida que obtendrá de su modelo dependen de los datos de entrada, pero desea tener control sobre ellos; entonces usas una función de activación. Dependiendo de la función de activación, puede obtener diferentes rangos para los datos de salida. Por ejemplo, puede obtener [0,1], [-1,1], etc. Esto le permite saber cómo se devolverán sus datos y qué significa esto (una probabilidad, por ejemplo). No profundizaré en este tema, pero es muy importante saber qué funciones de activación existen, qué hace cada una y qué representan los datos dependiendo de la función de activación utilizada.
Ok. Con estos conceptos definidos, podemos usar pytorch para resolver un problema básico: para entrenar un modelo que pueda clasificar una imagen del Fashion-MNIST dataset: un conjunto de imágenes de ropa en escala de grises de 28×28 que se utiliza como punto de partida para aprender pytorch. Recuerde instalar pytorch antes de continuar.
Definiendo y entrenando el modelo
Entonces, antes de comenzar, debemos importar el conjunto de datos F-MNIST desde el paquete torchvision. Teniendo en cuenta que este conjunto de datos es muy utilizado como punto de partida, pytorch lo tiene como un conjunto de datos precargado. No voy a explicar cada línea aquí, simplemente estamos descargando y normalizando los datos para asegurarnos de que todas las imágenes tengan las mismas propiedades. Por lo general, también tendríamos que cambiar el tamaño de las imágenes, pero el conjunto de datos que estamos utilizando ya lo ha hecho por nosotros, por lo que no es necesario.
import torch
from torchvision import datasets, transforms
import helper

# Define a transform to normalize the data
transform = transforms.Compose([transforms.ToTensor(),
                                transforms.Normalize((0.5, 0.5, 0.5), (0.5, 0.5, 0.5))])
# Download and load the training data
trainset = datasets.FashionMNIST('~/.pytorch/F_MNIST_data/', download=True, train=True, transform=transform)
trainloader = torch.utils.data.DataLoader(trainset, batch_size=64, shuffle=True)

# Download and load the test data
testset = datasets.FashionMNIST('~/.pytorch/F_MNIST_data/', download=True, train=False, transform=transform)
testloader = torch.utils.data.DataLoader(testset, batch_size=64, shuffle=True)
Después de comenzar, debemos definir el modelo. Para esto, pytorch ofrece varias opciones. Lo vamos a definir como una clase, pero también podemos usar el módulo torch.nn.Sequential. Entonces, aquí está nuestro modelo.
from torch import nn, optim
import torch.nn.functional as F
class Classifier(nn.Module):
    def __init__(self):
        super().__init__()
        self.fc1 = nn.Linear(784, 256)
        self.fc2 = nn.Linear(256, 128)
        self.fc3 = nn.Linear(128, 64)
        self.fc4 = nn.Linear(64, 10)

    def forward(self, x):
        # make sure input tensor is flattened
        x = x.view(x.shape[0], -1)

        x = F.relu(self.fc1(x))
        x = F.relu(self.fc2(x))
        x = F.relu(self.fc3(x))
        x = F.log_softmax(self.fc4(x), dim=1)

        return x
Por lo tanto, nuestro modelo tendrá 784 entradas (porque cada imagen tiene 28×28 píxeles) y 10 salidas. Estas salidas están definidas por el conjunto de datos que estamos utilizando. Si revisa la documentación del Fashion-MNIST dataset, notará que las imágenes se clasifican en 10 clases. Entonces, nuestro modelo devolverá la probabilidad de que una imagen pertenezca a cada una de estas clases.
Como pudo ver, usamos la función __init__ para definir las capas de nuestra red. El primer número es cuántas entradas tendrá nuestra capa, y el segundo es cuántas salidas. Observe que el primer número de nuestra primera capa es el número de entradas que tiene el sistema y el último número de la última capa es el número de salidas. Es por eso que estas capas se denominan capas de entrada y salida, respectivamente.
Luego, definimos los métodos de avance. Este método analizará la entrada, moverá los datos a través de las capas y devolverá el resultado. Si te das cuenta, usamos el RELU como la función de activación para las capas ocultas pero la función SoftMax como la función de activación para la capa de salida. Esto se debe a que SoftMax devuelve un valor entre 0 y 1 que puede usarse como probabilidad. No voy a profundizar en este tema, pero es una de las funciones más utilizadas en el Machine Learning. El log_softmax simplemente usa la función de registro después de obtener el resultado para evitar el uso de valores pequeños en el proceso de capacitación. Para obtener el valor real, solo necesita usar exp en el resultado.
Después de definir nuestro modelo, necesitamos definir la función de pérdida que vamos a usar, generalmente llamada criterion. Además, necesitamos definir el algoritmo optimizador que vamos a utilizar. Puedes consultar la documentación para leer sobre los diferentes algoritmos que puede usar.
model = Classifier()
criterion = nn.NLLLoss()
optimizer = optim.Adam(model.parameters(), lr=0.003)
Y ahora, vamos a entrenar a nuestro modelo.
epochs = 5
for e in range(epochs):
    for images, labels in trainloader:
        log_ps = model(images)
        loss = criterion(log_ps, labels)
        optimizer.zero_grad()
        loss.backward()
        optimizer.step()
Realizaremos 5 pasos de entrenamiento (epochs) para entrenar a nuestro modelo. Debería ser suficiente tener un error bajo en la red porque estamos usando un conjunto de datos simple. Para un conjunto de datos más grande y complejo, imágenes con colores y diferentes dimensiones, por ejemplo, requeriríamos una red más compleja, así como más epochs y otras consideraciones que no voy a explicar aquí.
Después de esto, nuestro modelo tendrá los valores de peso y sesgo actualizados para clasificar correctamente una imagen de nuestro conjunto de datos. Entonces, ¡probémoslo!
# we get one random image from the dataset
dataiter = iter(testloader)
images, labels = dataiter.next()
img = images[1]
ps = torch.exp(model(img))
Con un poco de ayuda de matplotlib y numpy, podemos obtener una imagen como esta:
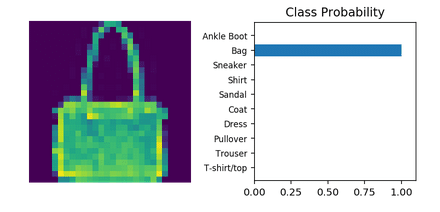
¡Y eso es todo! Tenemos una red neuronal básica que puede clasificar una imagen.
Machine Learning es un tema grande y complejo que acabo de comenzar a explorar. Además, Pytorch es una biblioteca muy intuitiva y poderosa que facilitará el proceso de programación; especialmente si eres nuevo en este tema.
Me gustaría agradecer a Udacity y Facebook por su curso de deep learning with pytorch. Todo el código y el material utilizado en esta publicación de blog es de allí y todos los créditos intelectuales les pertenecen. Solo quería usarlo para compartir una pequeña publicación de blog sobre Machine Learning y atraer a más personas a este tema. Puede encontrar este código en su cuenta de github.